Team retrospectives
Learn how to moderate team retrospectives, conduct health checks, and track actions.
To the retro softwareFind answers to frequently asked questions and in-depth guides to all areas of Echometer.
Watch the two most important workflows in Echometer and get started directly with the right tool.
Learn how to moderate team retrospectives, conduct health checks, and track actions.
To the retro softwareLearn how leaders prepare 1:1 meetings, use conversation starters, and measure progress.
To the 1:1 tool
Get an overview to get started quickly
To get started successfully in Echometer, a few terms are particularly important:
In Echometer, every customer has their own workspace. The workspace usually corresponds to the name of your organization / employer. You can find the name of your workspace in the top left of the sidebar:

All teams are assigned to one workspace. As a Echometer user, you can be a member of several workspaces at the same time.
Administrators of a workspace can create teams in a workspace. The surveys and retrospectives take place in the teams. All teams in which the logged-in user is a member are displayed on the left in the sidebar:

A user can be a member of several teams at the same time. Every team needs at least one team admin.
The retrospective is a team workshop that teams use in Echometer to reflect on their collaboration and derive actions. In the run-up to the retrospective, feedback is obtained from the team as part of the survey, in order to then explain it in the retrospective, prioritize it and derive actions from it. More on this in What is a retrospective? and The phases of a retrospective .
Team members have the opportunity to participate in the retro via mobile phone. The Mobile Retro supports all interactive elements and is perfect for e.g hybrid retrospectives. Just scan the QR code at the beginning of the retro.
Are statements for which consent is requested as part of the survey. The results are then reflected in the team’s retrospective. Items are available at team and workspace level. Depending on the level, the results end up in the Team Health and Workspace Health Dashboard after the retro.
Background of the Health Check Items in Echometer:
The proposed items in Echometer mainly come from research and represent preconditions for, among other things, innovative strength, employee engagement and productivity. You can find out more in our How-to video .
– Christian Heidemeyer, Co-Founder of Echometer & Psychologist
Summarizes the results of the team items from previous surveys and retrospectives of a team.
Analogous to team items, summarizes the results of the workspace items across teams at the workspace level.
All Echometer users have a personal feedback link. By sharing the link you can ask e.g. your colleagues for personal feedback.
Are surveys sent by team admins to get the teams feedback. Surveys can be sent as part of the retro preparation or separately from a retro. In both cases, it is possible to include the survey results in a retrospective.
Are to-do’s that can be created e.g. at the end of a retrospective. You can find a guide on how to create good measures in this blog article.
The authorizations in Echometer are based on 3 roles:
Workspace admin
Team admin
Team members
A retrospective is a team workshop designed to reflect on and improve collaboration.
In Echometer, the retrospective is a core element for initiating and managing a continuous improvement process - always with the team and the needs of the team members at the center.
You can find a detailed introduction here: What is a retrospective?
You can find more information about the retrospective process in the our article about the phases of a retrospective.
To get an overview of the possibilities in Echometer, we recommend taking a look at our How-to videos.
As a workspace admin, you can create new teams and then assign admin rights for the team to a colleague.
The team admin can then add other team members, adjust the team health rotation and start directly with the first survey.
To stay up to date, you can sign up for the Echometer newsletter when you register.
When new features are released, a banner will appear in Echometer, notifying you and asking you to reload the page so that the new features are activated.
You can find a list of all new functions in our public change log.
Alternatively, become part of our Slack community, where we at Echometer regularly communicate updates on new features or changes.
You want to be the first to know what topics we are currently working on and discuss further developments with us?
Then join ours Slack community and exchange ideas with like-minded people on relevant topics. You can also use Slack to make requests, give or receive feedback and support.
You found a bug in Echometer?
You can either write it to us via support [at] echometer.de or send it directly from Echometer. You will find a corresponding feedback field below on the left behind the question mark:

Would you like to receive more support with the introduction or rollout of Echometer?
To unleash Echometer’s potential in your teams, feel free to contact our Customer Success team at any time. We can (for an additional charge) support team onboardings and workshops for the rollout of Echometer, or we can also refer you to experienced consultants from our network.

All information for new moderators of retrospectives in Echometer (team admins)
Does your team regularly take longer than planned to complete retrospectives and you’re wondering how to improve time management?
Here are our tips:

Are you wondering how your team can come up with useful action items and how you can track them with Echometer?
On the subject of action items in retrospectives, we have one blog article with some tips and examples summarized for you. Check it out!
The retrospective in Echometer follows the classic steps from the textbook:
Furthermore, Echometer includes the step “Review existing measures,” which, depending on your settings, you can place before or after “Collect feedback.”
To better understand the concept of how a retrospective works, we recommend our Blog article on the “5 Diamond Model”.
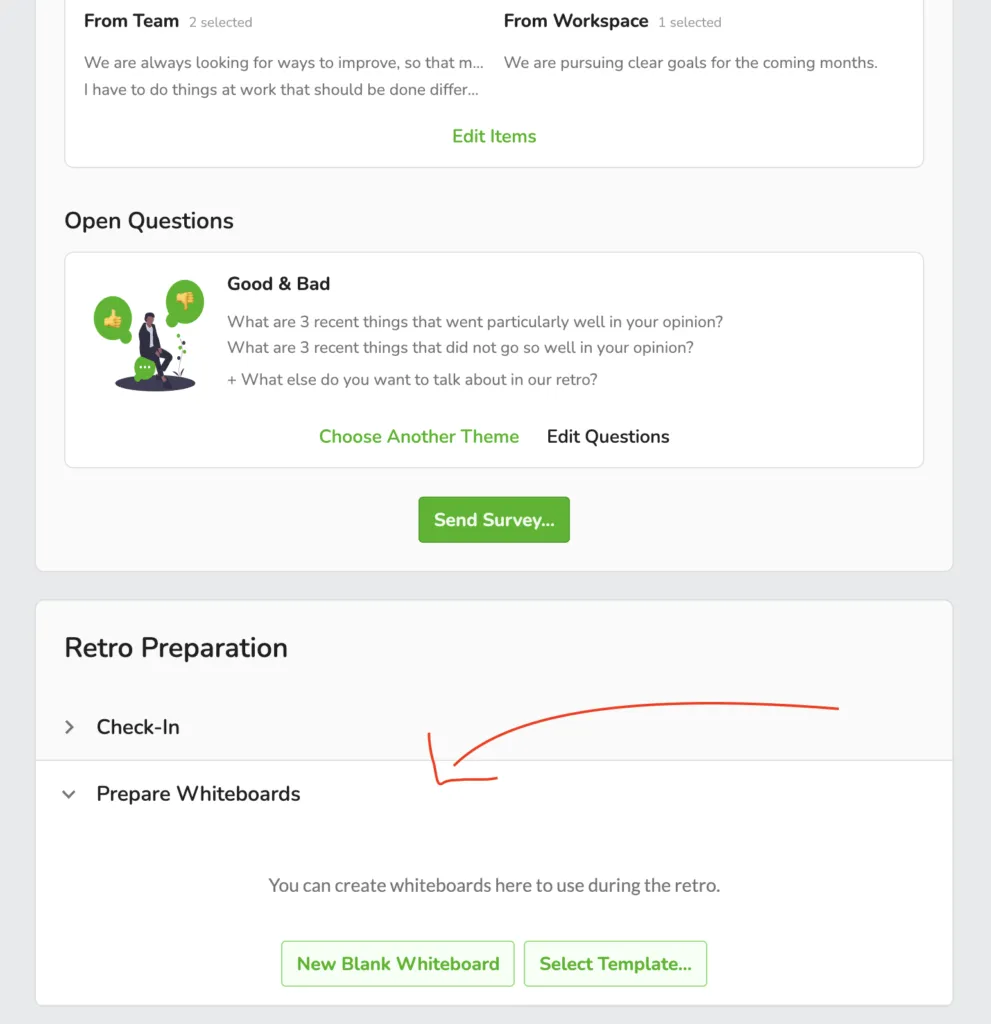
Tip: You can use whiteboards (bottom right menu) to flexibly break out of the format and insert creative workshop formats. You can prepare whiteboard templates in advance of the retrospective and then use them:

We believe that the “Spotify Health Check” is not the only correct way to measure team health. Rather, the topics of the Health Check should be adapted to the needs of the team.
This is exactly what the team health rotation in Echometer is for. The items marked in the item pool are included in the rotation and end up in the survey drafts in turn. This way you collect feedback on the items in turn.
To customize the rotation, select the items you want to include in your health check in the item pool. Use the search bar and the templates (top right of the search bar) to find matching items. If you don’t find what you are looking for, you can add your own items using the button below the list:

Want to get feedback from your team before the retrospective to save time in the retrospective and give team members enough time to think?
With Echometer, you can easily set up surveys for your team and benefit from automatic team health rotation. You can also get inspiration from the templates for the open questions.
Both the items from the rotation and the open questions from the templates can be edited individually.
The survey is automatically sent to all team members via email. You can also copy the survey link manually from the team page.

Please note that there are different types of whiteboards in Echometer:
| Whiteboard type | Description |
| Whiteboard templates | - are designed to be prepared once and then reused more often |
In the sidebar on the left you will find the “Whiteboard Templates” tab. Here you can either take a look at the whiteboard templates provided by Echometer (see explanation of the templates here) or create your own templates:

As part of the preparation for a retrospective, you can also prepare whiteboards. To do so, you can either use a whiteboard template and adapt it, or open a new, empty whiteboard:
If you select a whiteboard template, a copy of the template will be created for the upcoming retro. The whiteboard template itself is not changed.
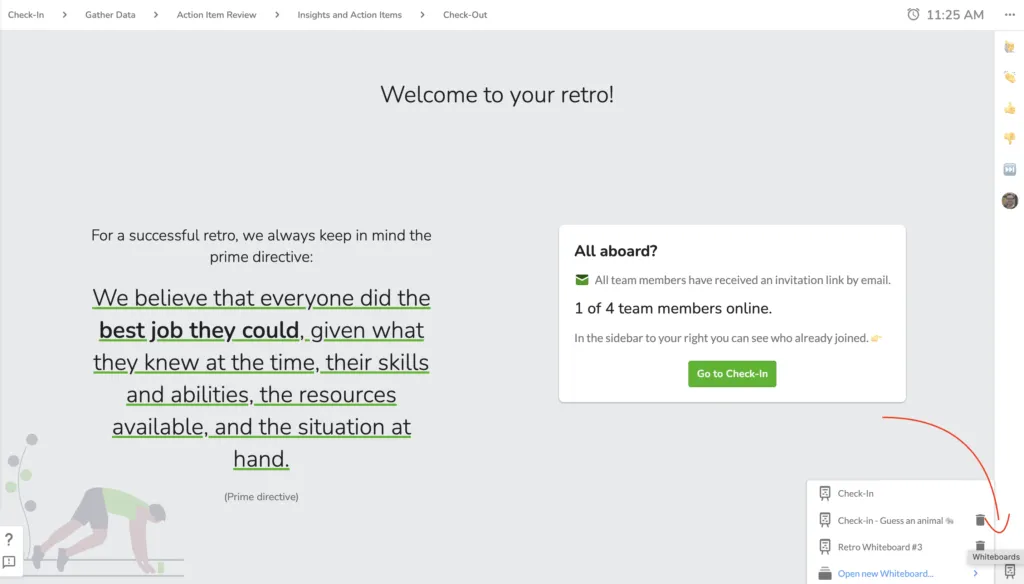
As a moderator in a retrospective, you can easily open the prepared whiteboards and whiteboard templates via the whiteboard symbol at the bottom right:
Alternatively, you can also select an item on the retro canvas and create a whiteboard linked to it. The selected feedback is automatically inserted on this whiteboard:


Easy to understand cross-team developments
If you use Workspace Pulse Check surveys, Echometer will automatically generate individual surveys for each team to cover the outstanding questions. See details: Understanding Workspace Health Rotation
As a team admin, you can see your team’s pulse check surveys in the “Surveys” tab of your team:

Workspace pulse check surveys are open by default for 2 weeks after they are created and then close automatically. As a team admin, however, you can also close the surveys manually before the 2 weeks have expired. Of course, you should only do this in consultation with your team.
The results can only be viewed when a survey is closed.
Even while the survey is still open, you can link the survey to your upcoming retrospective. To do this, open the survey and click “Use results in retro”:

Attention:
You can see whether the survey has been successfully linked to the retrospective by the yellow box with the reference to the linked survey in the retro preparation:

In addition to the results of the survey, you can also flexibly add further health check items or other open questions to the retrospective board. Although these are then not part of the survey, they can simply be answered within the retrospective.
In this video, you will learn how to set up the Pulse Check at workspace level in Echometer and what you should pay attention to:
Here is a short summary:
With the Workspace Pulse Check you can …
The Workspace Pulse Check …
Here are a few tips on how to set up a health check at workspace level.
In addition to the Workspace Health Check, we also recommend one Team Health Check put on.
In Echometer, in addition to the suggested scale items, you can also formulate your own items for your health check.
Scale items are statements for which the survey asks for agreement:

You should pay attention to this when formulating your own scale items:
Take a look at our tips for setting up health checks on team- as well as health checks at workspace level.
In the workspace health you will find an overview of the cross-team results, which are shown in various diagrams.
Filter groups of teams
If you have defined groups of teams, the dashboard offers filtering by these groups of teams. You can filter only those groups of teams in which at least 3 teams that are not excluded from the workspace have participated in the workspace health rotation. Groups of teams with 2 or less teams are accordingly not selectable in the filtering:

Spider chart & individual values
The spider chart shows average values across the categories of the items. In addition to the average, the highest and lowest 10% can be displayed.
Below this, the individual values per category are listed. In addition to the current average and trend on the left half, the graph on the right also shows the time history with average and top/bottom 10%:

Heatmap
The results of the teams per item are shown in the heatmap by category.
If you move the mouse pointer over a tile, the average is displayed. With a click, the individual results over time are shown under the heatmap.

Depending on the settings of the workspace, the heatmap may be turned off to further protect the anonymity of the teams.
Every user should be considered in the workspace health. At the same time, individual persons should not be weighted twice. This happens when users are in multiple teams. It is therefore possible to exclude teams from the workspace health rotation.
A common use case for this function are teams that exist in addition to the fixed teams. In these cases, Workspace Health items (formerly “Echo Items”) would be requested twice for team members if members are also in other teams in parallel. Specifically, these duplicates often affect:
To exclude teams, select them in the team list in Workspace Administration and select “Exclude from Workspace Health” under Actions.
Teams can also be added back later.

Would you like to filter the results in the Workspace Health Dashboard in more detail - for example, by functional areas or business units?
Then team groups are the solution. Select the teams in the team list of the Workspace Administration and select “Move to group…” under Actions.
If you have already created team groups, select an entry from the list or create a new team group:

Do you want to check certain topics regularly across all teams? Then the workspace health rotation helps you to automate exactly that.
As a workspace admin, you can adjust the workspace health rotation by activating the checkboxes to the left of the items:

By default, 2 of these activated items from the Workspace Health rotation are always suggested for the teams’ retrospectives. Team admins can customize these suggested items as they wish, unless you select the “Enforce rotation” checkbox:

There is also the option of setting additional fixed frequencies for the items:
If you select an interval, this item is suggested for every new retrospective of a team that has not yet answered this item within the selected period.
The rotation logic then works as follows:
You would prefer to query the workspace items separately and not necessarily as part of the team retrospectives? No problem, then activate the “Workspace Pulse Check”.
The pulse check workspace automatically generates surveys and checks in all teams which items in the selected interval have not yet been answered by the team. All workspace items that have not yet been answered in the selected interval are then included in the team’s pulse check survey.
With the Workspace Pulse Check, you ensure that all workspace items are answered with a frequency by all teams - even if they have not carried out a retrospective within the interval.
Further details and video tutorial: Workspace pulse check


Manage teams properly - for team and workspace administrators
Here are a few tips on how to set up a team-level health check.
Just start: You don’t have to be a psychologist to set up a Team Health Check - although it would certainly help. Echometer makes it very easy for you to select from the proposed Team Health Check items using the templates. Therefore, our recommendation: Just start and gather initial experience in the team before you try to perfect the Team Health Check!
Focus on the essentials: Instead of directly asking for a large number of sub-aspects, start with relatively general statements. This way, after the first results, you can specify the items more precisely if needs for action become apparent. Example of a general statement on the topic of communication:
Question existing items: Are some health check items constantly assessed and no longer cause new reflections even in the retrospective? Then consider removing this item from rotation.
Adapt items to challenges in the team: Does your team have current challenges or specific problems? Create your own Team Health Check items that address these challenges exactly. It is also worth asking the team: “What are our biggest challenges in the team and how do we need to change ourselves and our collaboration in order to master these challenges?” The results from a brainstorming session can give you valuable impulses to adapt your Team Health Check to your team.
Learn more about how you can formulate own scale items for your team health check.
In Echometer, in addition to the suggested scale items, you can also formulate your own items for your health check.
Scale items are statements for which the survey asks for agreement:
You should pay attention to this when formulating your own scale items:
Take a look at our tips for setting up health checks on team- as well as health checks at workspace level.
Would you like to adjust the team health measurement of your team? It’s very easy with team templates and rotation.
Here are a few definitions
Note: You need team admin rights to adjust the team health.
Navigate to the “Team Health” page and select the “Edit Rotation” button there.

Here you can choose whether you want to (1) work with a team template, (2) search for individual items, or (3) create your own item.

The team templates contain selected questions on a specific topic. You can include the questions directly in your item rotation.
In the “Search & Filter” tab, you can search for items using keywords and filter them by specific topics. You can add the items to the item rotation using the “Add” button. For each item, you will be shown directly whether it is already in your item rotation and when it was last queried. If you want to remove an item from your rotation, you can do so using the “Remove” button.

Do you have an item in mind for which you cannot find a suitable wording in the list? No problem, then create an individual item under the “Own Item” section:

When creating an item, enter a German and English translation directly, as required. The new items are added to the “Own Items” category at the top of the list.
Would you like to expand your team, remove people, or assign / withdraw the team admin role?
To do this, navigate to the team member list in the team settings:

To be able to edit the team members, you must have team admin rights yourself. If you don’t have these rights, you can at least check the team settings to see who is currently the team admin.
Note: A team in Echometer must always have at least one team admin. You can name as many people as you want as team admin.
For all questions about your personal access
To delete your account, first log in to the Echometer app: https://my.echometerapp.com/
Tips
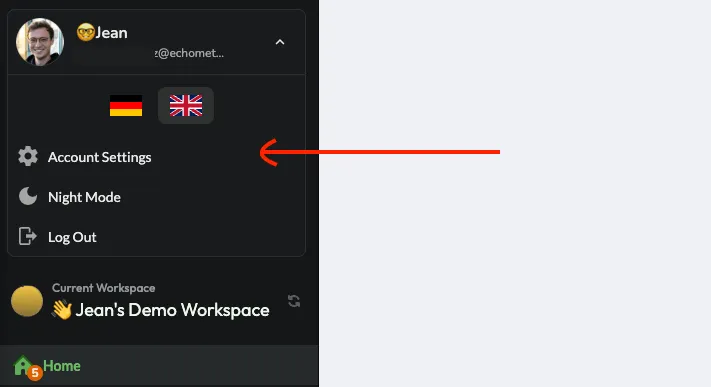
Once you are logged in, click on your name in the upper left corner and then click “Account Settings”:
In the account settings, scroll down to the “Danger Zone” and click “Delete Account”:

To confirm the deletion, you will be asked to enter your password again.
Yes. If you don’t have a password, or don’t know it, you can simply set a new password under “Password” in the account settings and use it directly to confirm the deletion of the account.
If you have problems with deleting your account, please contact us via support [at] echometer.com.
Echometer is currently available in German and English. Here is how you can change the language:
In the menu
Simply move the mouse over your username in the upper left corner and then select the desired language in the menu:

In the survey
To change the language in the survey, simply click on the language in the upper right corner:

Note: When the team admin sends out the survey, the language selected at the time will be used for the email and the survey, provided that the recipients themselves have not yet selected a language in Echometer or are not yet registered in Echometer.
In the retro
In the retro you change the language by clicking on the three dots in the top right and then choose the language accordingly:

Open your account settings by hovering your mouse over your name and email address in the menu bar at the top left and select the entry in the list.

Here you can upload a profile picture and change your name:

Tip: You can also change your name in a retro by moving over to your entry in the list of participants in the sidebar on the right and clicking the edit button:

If you are logged into your Echometer account and want to change your password, you can do this via your account settings. You can find this by moving your mouse over your name and email address in the menu bar at the top left and selecting the entry in the list.
Here you can enter and save your new password:

Forgot your password and can’t access your account?
Also no problem. When logging in, simply use the option to generate a “login link” by clicking on “Forgot password” after entering your email address:

Echometer will then immediately send you a link with which you can set a new password for your account.
If you have not received the email within 5 minutes, please contact support [at] echometer.de
Especially for admins of an Echometer workspace
The most important facts in brief:
If you have any questions regarding IT-Security and DSGVO at Echometer, you can always contact our email support: privacy[at]echometer.de
Only workspace admins can remove users from Echometer. To do this, go to the workspace administration under “Workspace Members” and select the person from the list.
In the window that opens, simply click “Remove” and confirm the action. Important: If the user is the only admin of a team, either another admin must first be appointed for this team, or the team must be archived.

First check which type of billing is relevant for you:
Each team in the workspace is billed as a service unit. If a team is no longer required, you can archive it. Archived teams are not invoiced.
The invoices can be downloaded under “Workspace Settings>General”

All users who can access a workspace count as workspace members.
For billing, only “active workspace members” are relevant. Active workspace members are those who are in an active team. An “active team” is any team that has not been archived.
You can simply archive inactive teams under “Workspace Settings>Teams” and their members will no longer be billed in the next month.
In the workspace administration under “Workspace Members”, the current number of users can be viewed and, in addition, an export of the billed licensees can be downloaded on a monthly basis:

Invoices are sent as PDF via email to an agreed mailbox. To change this mailbox, please contact “accounting at echometer.de”.
Tip: The “Remove inactive workspace members” button allows you to remove inactive members (i.e. users who are not in an active team) with one click. Once they have been removed, they will no longer have access to the contents of the workspace.

Echometer supports the SAML authentication flow. SAML is only responsible for authentication - it provides a flow for provisioning and synchronizing users between Echometer and the connected federation.
The company “BigSoftware Corp.” wants to use Echometer with its employees. All employees already have a user account in the login portal of BigSoftware, which supports its use as a SAML Identity Provider (IDP).
Echometer can now connect BigSoftware’s IDP to the Echometer workspace that has been set up for BigSoftware. Company BigSoftware can now configure per user which users are allowed to log in to Echometer by simply adjusting their IDP settings.
In your Echometer workspace, navigate to Workspace settings>Integrations.
To set up SAML for your workspace, you need the Echometer Business or Enterprise version. In the free version or the Pro version, you will be informed accordingly about the necessary upgrade.
You can now make the settings here:

In the settings, for example, you can select whether a login with SSO should be enforced for all or some workspace members.
With the JIRA integration in Echometer, action items created in Echometer can be created in a JIRA project.
The JIRA integration must first be set up by a workspace admin. To do this, navigate to “Integrations” in the workspace administration and add the link to your JIRA instance.

As soon as the JIRA integration is activated for the workspace, every user can activate their access in the account settings. You can find the account settings by hovering your mouse over your name and email address in the menu bar at the top left and selecting the entry in the list:
At the bottom of the account settings you will find the button to authenticate yourself with JIRA:

After successful setup, an additional option appears when creating action items, which can be used to configure the creation of the action item in JIRA:

In addition, the action items created in JIRA can be opened directly via the Echometer action items:

Echometer can be integrated with all versions of self-hosted Jira instances as well as Jira Cloud that are still supported by Atlassian. It should be noted that access to Jira must not be blocked (e.g. by a firewall).
Are you having problems setting up? Then contact our support!
Echometer is a web app and runs in the user’s browser. Echometer supports all modern browsers from Safari, Chrome, Edge, Firefox to Opera.
Echometer can be used without restrictions on tablets and PCs (Windows, Linux and Mac). In contrast to the surveys, the layout of the menu navigation and the retrospective is not optimized for mobile use on smartphones.
Important note: Internet Explorer is not a “modern browser”, but rather as Microsoft says it is a compatibility solution for outdated software. Therefore it is not supported.
Your organization had multiple workspaces in Echometer for “historically grown reasons” and now all teams are to be migrated to a common workspace?
How to migrate a team from an old to a new workspace:


Write us a short message or book an appointment directly — we will get back to you personally and be happy to help.